Hello again and welcome to the fifth and final release of this recipe series. This week we took a trip to the other side of the world, where fine craftsmanship oozes through society’s pores, precision and order is a way of life, and there are no shortage of traditions and delicious cuisines. The place in question: Japan!*
Chicken Katsu was the star of the show in my kitchen this week. I can confidently say that this dish blew the other four dishes out the water. Obviously, this rating is based on my abilities and how well I cooked it. It very well could have been a different story if I let a professional chef cook each of the meals in my series. However, if we’re talking purely about how my final dish tasted, then this one was leaps and bounds my favorite for a few reasons.
I executed it the best. I didn’t have any major blunders. My shortcomings were minimal.
While this dish was indulgent due to the deep fried goodness, it was still well-rounded — there was a carb, protein, sauce, and side of veg. This in stark contrast to some of the previous dishes in this series, such as the French Onion Soup and Risotto. My ideal dish is tasty, nutritious and balanced, and Chicken Katsu satisfied these requirements.
There were a lot of textures and flavors — the spicy crunch from the cabbage slaw, the sweet umami saltiness from the sauce, and the perfect crunch from the fried chicken. Anything that provides my taste buds with variety and fun is a winner in my books.
It’s a simple cook. There was not excessive technique involved nor excessive stirring (see Risotto and French Onion Soup). The caveat is that deep frying creates a bit of a mess. More on this below.
This was my first time deep frying. I’ve shallow fried before (chicken parm) but was always hesitant to deep fry because of the mess that came with it and my minor fear of causing a grease fire and burning my house down. Anyways, I can confirm that Chicken Katsu is worth every bit of the mess. And quite honestly, if you don’t want to deal with all that effort, just order it the next time you’re at a Japanese restaurant! You won’t leave regretting your order.
There were various recipes I found, but this was the primary one I followed.
*Disclaimer: I have yet to visit.
Ingredients
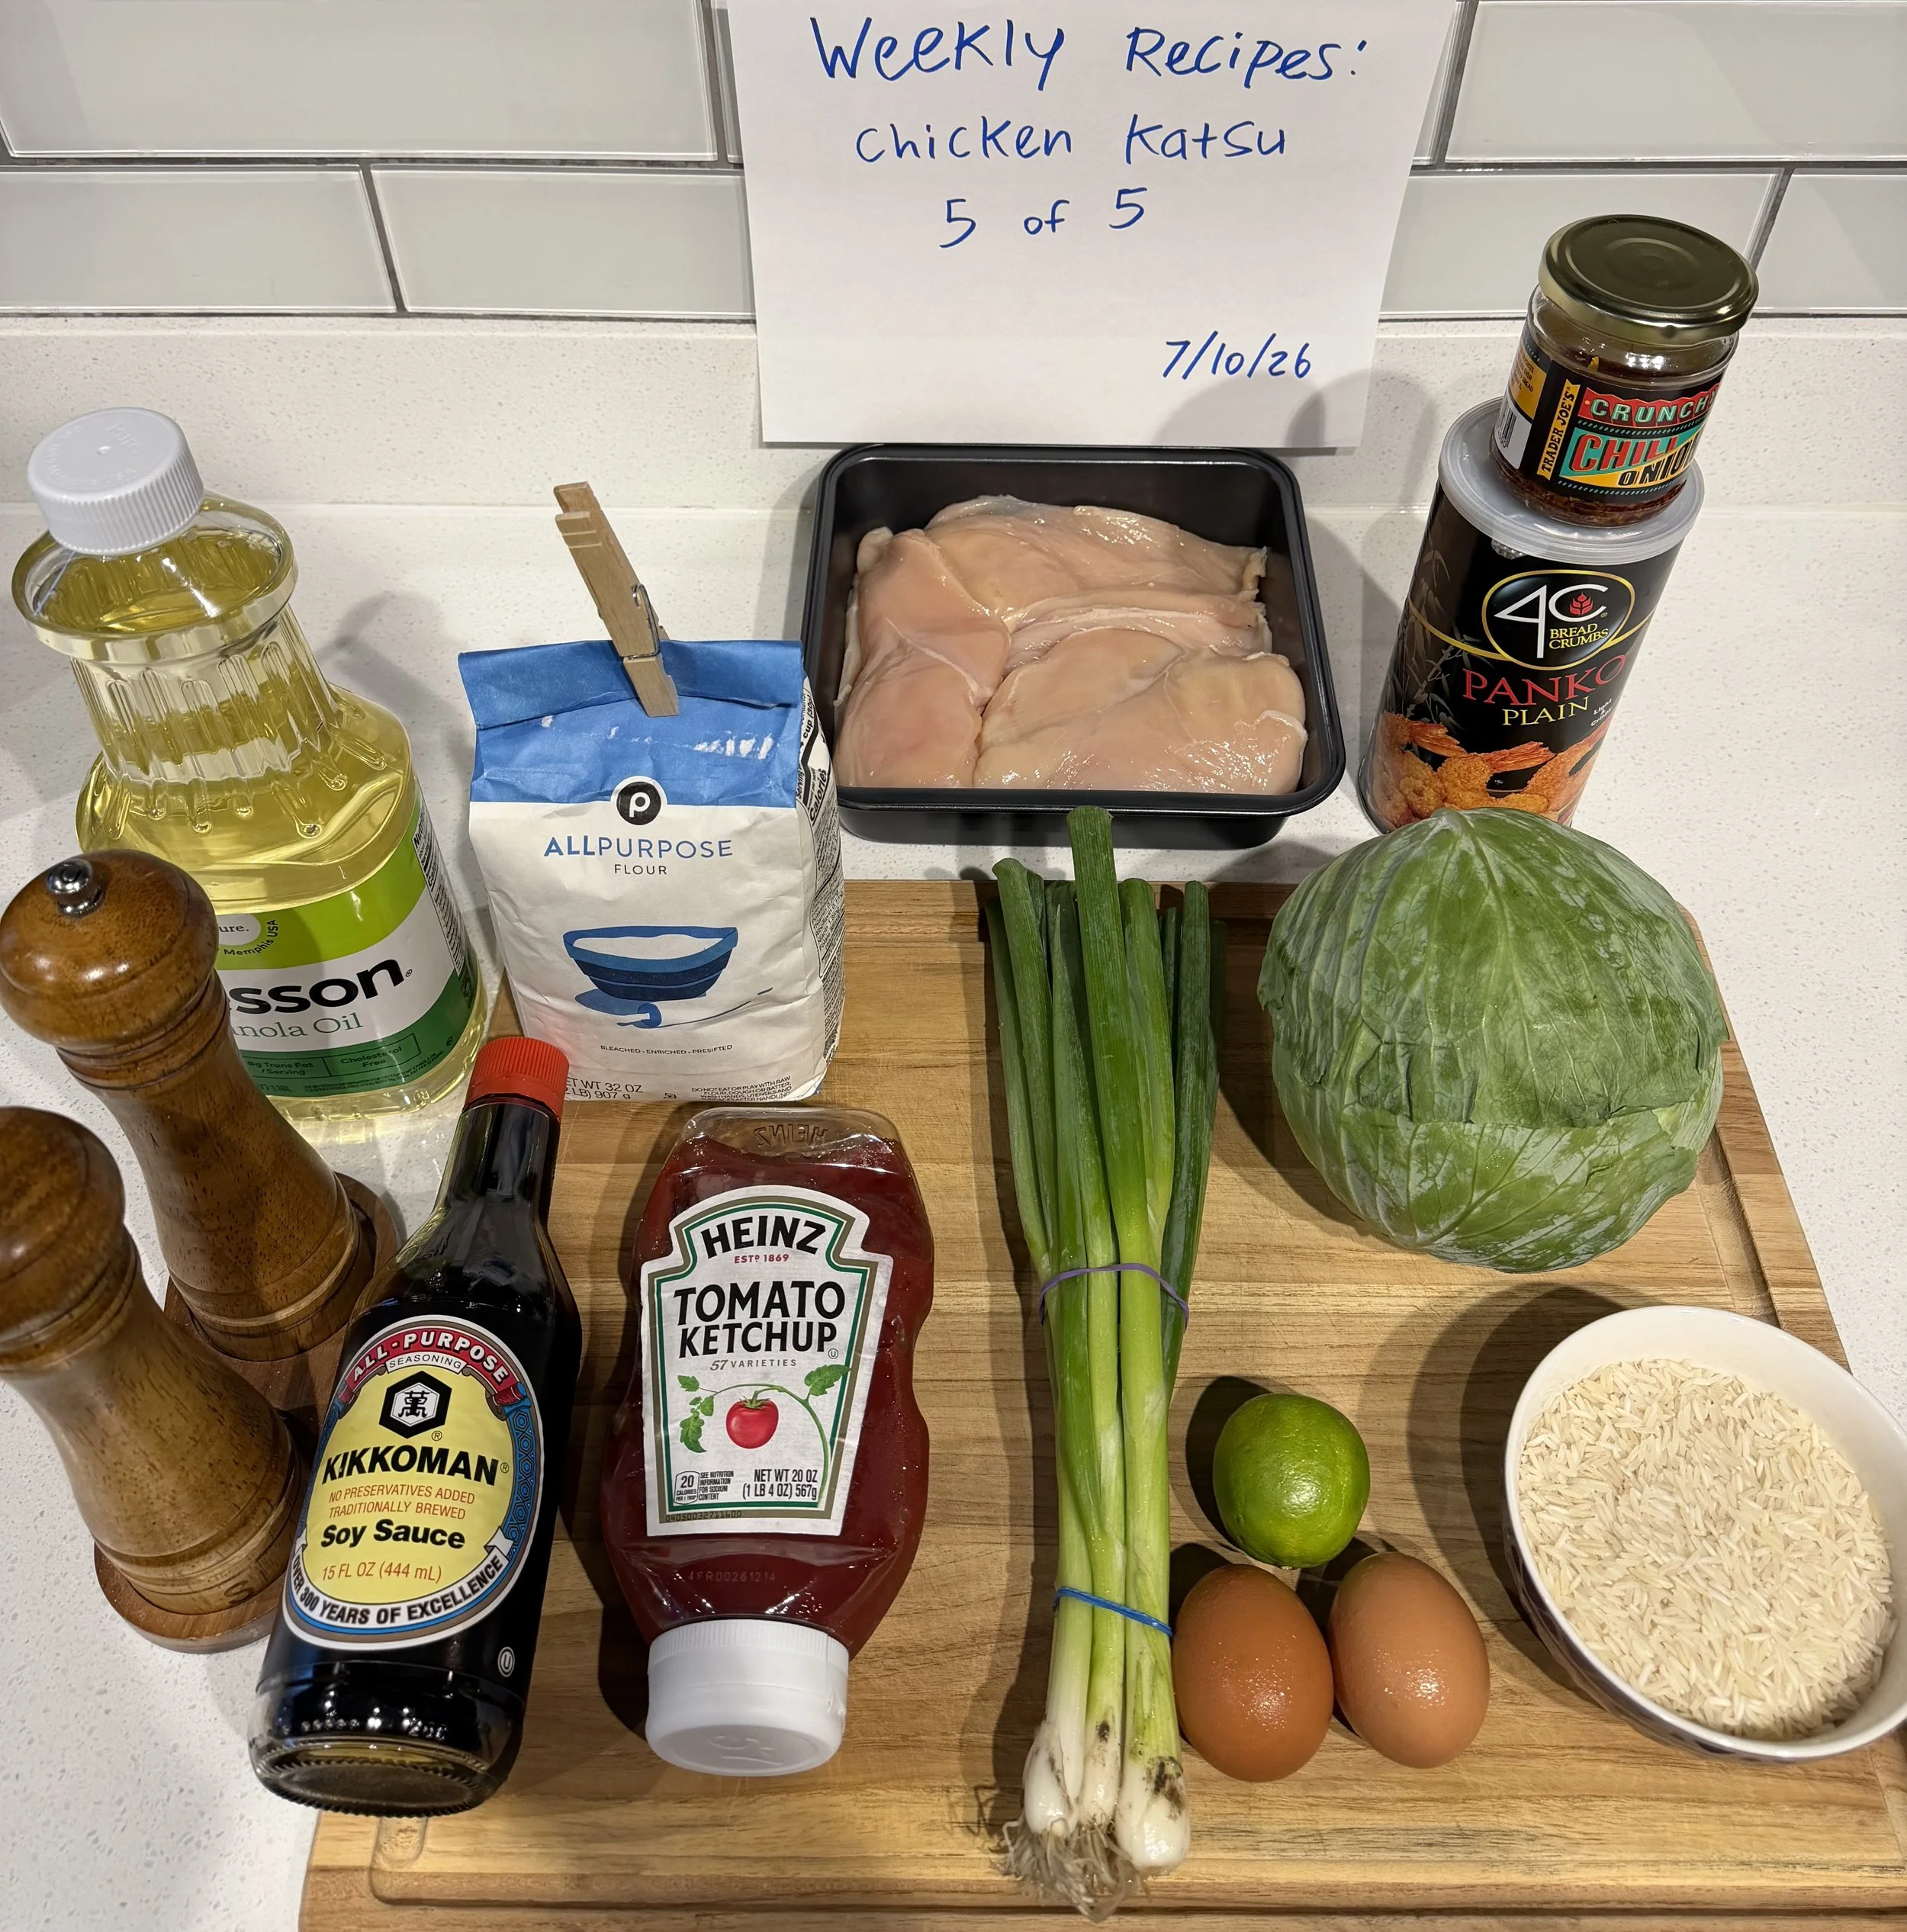
See image below. Aaaaand let me beat a dead horse one final time… no measurements were taken. I just went with the flow.
Cabbage
Green Onions — Optional. All five of the recipes I reviewed, besides one, simply had shredded cabbage and a lemon wedge on the side. However, I wanted more depth to my side, so I followed the lone recipe that suggested mixing in green onions and chili oil / crunch to create more of an Asian slaw. I missed the part about adding a squeeze of lemon — more on this below
Chili Oil / Crunch — Optional
Lime — The recipes suggested lemons but I didn’t have any
White Rice
Chicken Breasts — An alternative recipe, which is very popular, uses pork cutlets
Panko Bread Crumbs — Make sure it’s panko. I don’t know all the science and reasoning behind why Panko is preferred, but it definitely makes for a better fry due to its flaky nature
Eggs — I originally used two but after realizing the volume of my chicken, I added a third egg
Flour — I used All Purpose (AP) flour
Ketchup
Soy Sauce
Worcestershire Sauce — I didn’t want to buy Worcestershire because I figured I’d only ever use it for this specific recipe. However, multiple recipes included it, and I’d recommend it because my sauce was lacking a lil something
On a side note, why is Worcestershire spelled so oddly. I never know how to pronounce it
Salt & Pepper
Canola or Vegetable Oil — Use an oil with a high smoke point since you’re deep frying
The Cooking Process
This dish is relatively simple to make. It just requires adequate countertop space to prep everything. Chicken Katsu is made up of three components: rice, side of cabbage (or slaw in my case), and the fried chicken. The rice is as simple as it gets. The cabbage is also pretty easy. It’s only the chicken that takes some time, but even that is not complicated.
20-30 mins: Rinsing and then cooking the rice. I made simple white rice (only added oil and salt to the pot), but if you want to zhuzh up your rice, go right ahead.
30 mins: Prepping the vegetables by shredding the cabbage and slicing the green onions. I didn’t have a mandoline, which was preferred, so my “shredding” was done with a knife. The reason I put this task at a half hour is because I was more precautious than normal due to the current foodborne illness (cyclosporiasis) spreading throughout the country. So once everything was chopped, it was all rinsed multiple times and then dried.
30 mins: Putting together the slaw by adding the shredded cabbage, green onions, a few spoonfuls of chili oil, and a squeeze of lemon into a bowl. Reminder that this step is optional because you can simply serve shredded cabbage as is. However, I recommend the slaw. Also, this step only takes a few mins. The reason for the half hour suggestion is to let the slaw marinate in the flavors, which allows the cabbage to slightly soften in the juices. To be clear, it will still have a significant crunch but it won’t be rough to eat like how raw cabbage is. It also won’t be bland. Shredded cabbage by itself is boring!
5 mins: Making the sauce, which was a combo of ketchup, soy sauce, and Worcestershire Sauce. As with any recipe, there were variations, but these three ingredients seemed to be the consistent suggestions.
10-20 mins: The time is dependent on how many chicken breasts you’re cooking. Putting each chicken breast in a plastic bag and then lightly pounding (emphasis on “lightly” because you don’t want to pulverize the chicken) it until it’s flattened. See image below.
15-25 mins: The time is dependent on how many chicken breasts you’re cooking. Putting together the dredging station by prepping the plates or breading pans. Pouring flour in one pan, panko breadcrumbs in another pan, and cracking 2-3 eggs in the final pan and whisking it all to a smooth consistency. Coating both sides of the pounded chicken breast in the flour, then immersing it in the egg wash, and finally covering every inch of its surface area in the panko breadcrumbs. Finally placing the fully coated breast on a baking sheet with a wire rack. Rinse and repeat for each chicken breast.
30-40 mins: Heating up a pot with oil and letting it reach the proper frying temperature. Frying each breast for 8-10 mins depending on its thickness. Flipping the breast about halfway through its fry. Unless you are using a very wide pot, fry one breast at a time because you don’t want to overcrowd the oil and prevent the breast from frying properly.
Lessons Learned
Per usual, I have some tips and lessons learned to improve your cooking experience not just for this dish but more generally if you ever want to fry a food.
I love sauce with most foods so it is a critical component of my dishes. If you are going to make the sauce, do it properly (i.e., add the Worcestershire Sauce). Where I went wrong was not just forgoing key ingredients but also pouring WAY too much soy sauce. I kept pouring in additional amounts of soy sauce until my sauce achieved the reddish-brown hue I’d seen in other recipes. While I knew soy sauce packed a powerful punch of flavor, in the moment I was on the quest to achieve the proper hue. So I completely disregarded the ingredient’s strength and kept pouring it in until my initial batch of sauce reached a hue to my liking that just so happened to be unbearable in taste. In hindsight, the Worcestershire would’ve helped with the hue.
On the topic of sauce, I think it’s worth venturing into the more advanced version of this dish: Katsu Curry. A curry would without a doubt take this whole dish to the next level by adding body to the chicken and turning the meal into a true comfort food. If you’ve never had a chicken katsu (or pork) lathered in the Japanese curry, then you’re missing out. It’s quite a wonderful culinary experience. Of all my tips in this section, this is probably the one I’d suggest the most.
When it comes to the fry, buy yourself a thermometer. It will eliminate all guessing, and you’ll know exactly when the oil reaches the proper frying temperature. I didn’t have one, and while my chicken turned out great, two of my four pieces didn’t achieve the golden brown fry that I was aiming for. This happened because I placed the chicken into the oil before it was hot enough. As is the case with adding any food into hot oil, the temperature of the oil will drop. So aim to have the oil be hotter than actually required so that when food is added, the oil’s temp drops to the actual temp required for frying. If you still prefer going without a thermometer because you don’t want another device piled up in your kitchen drawers, then try the following method. Stick a wooden spoon into the hot oil. If lots of small bubbles gather around around the spoon, then the oil is hot enough. The oil should not be smoking — that means it’s too hot.
This suggestion is applicable for anything that’s fried. Once the food finishes frying and is taken out, place it on a wire rack or paper towels and immediately sprinkle it with salt. Fried food best absorbs salt and seasonings when it’s fresh out of the oil and piping hot. Once the fried food reaches room temp, then adding salt is somewhat pointless because it won’t stick or absorb.
When it comes to the dredging station, ensure your breading pans or plates are large enough. Don’t underestimate how wide your chicken breast becomes after it’s been pounded flat. As you’re tossing floppy chicken from one pan to another, it helps to have pans that are larger than the piece of chicken. The benefits are twofold: 1. less of the pans’ contents spill out, 2. the chicken has enough room to lay flat in the pan, instead of being all scrunched up and not properly coating. Have you ever tried mixing salad in a bowl that’s too small? Well what I’m describing with dredging is the exact same principle. You’re safe if your pan / container is excessively large, but if it’s too small, you’re screwed and have created a headache for yourself.
Pound your chicken more than you think. It will allow for a better fry. You don’t want your chicken to be thin as paper, but it also shouldn’t be thicker than your finger. I think my issue was attributed to my chicken breasts being excessively thick (shout out all the steroids and antibiotics they pump our chickens with here in the States). So while I pounded them heavily, there was more pounding that could’ve happened;) You can also cut your chicken in half horizontally to essentially halve its thickness, and then pound it further from there.
Frying anything makes a mess. I don’t really have tips so this is moreso a FYI. The contents from the dredging station splatter all over your countertop and then the oil from the fry pops and splatters on your stovetop. In addition, at the end you’ll need to get rid of the oil and you can’t just pour that down the drain. So all things considered, there’s a lot of wiping down and cleaning required to remove the greasy mess that ends up everywhere.
Add acidity to the cabbage slaw!! This is a must. I completely missed this step in the recipe. It’s ironic because as I was prepping the slaw and then tasting it, I asked myself why the recipe didn’t mention anything about adding a splash of lemon or lime… whoops, I just wasn’t paying attention. There is a lot of richness to cut in this dish. There’s the hefty amount of fried chicken plus the chili oil lathered cabbage, so a squeeze of lemon over the slaw, and even the chicken, is a nice touch to balance everything out.
Thank You
If you’ve been following this recipe series, I hope you’ve been inspired to either cook one of these fives dishes or to order it the next time you go out to eat. Get out of your culinary comfort zone. Thank you for reading and being part of this journey!
May your taste buds be blessed,
Soheil
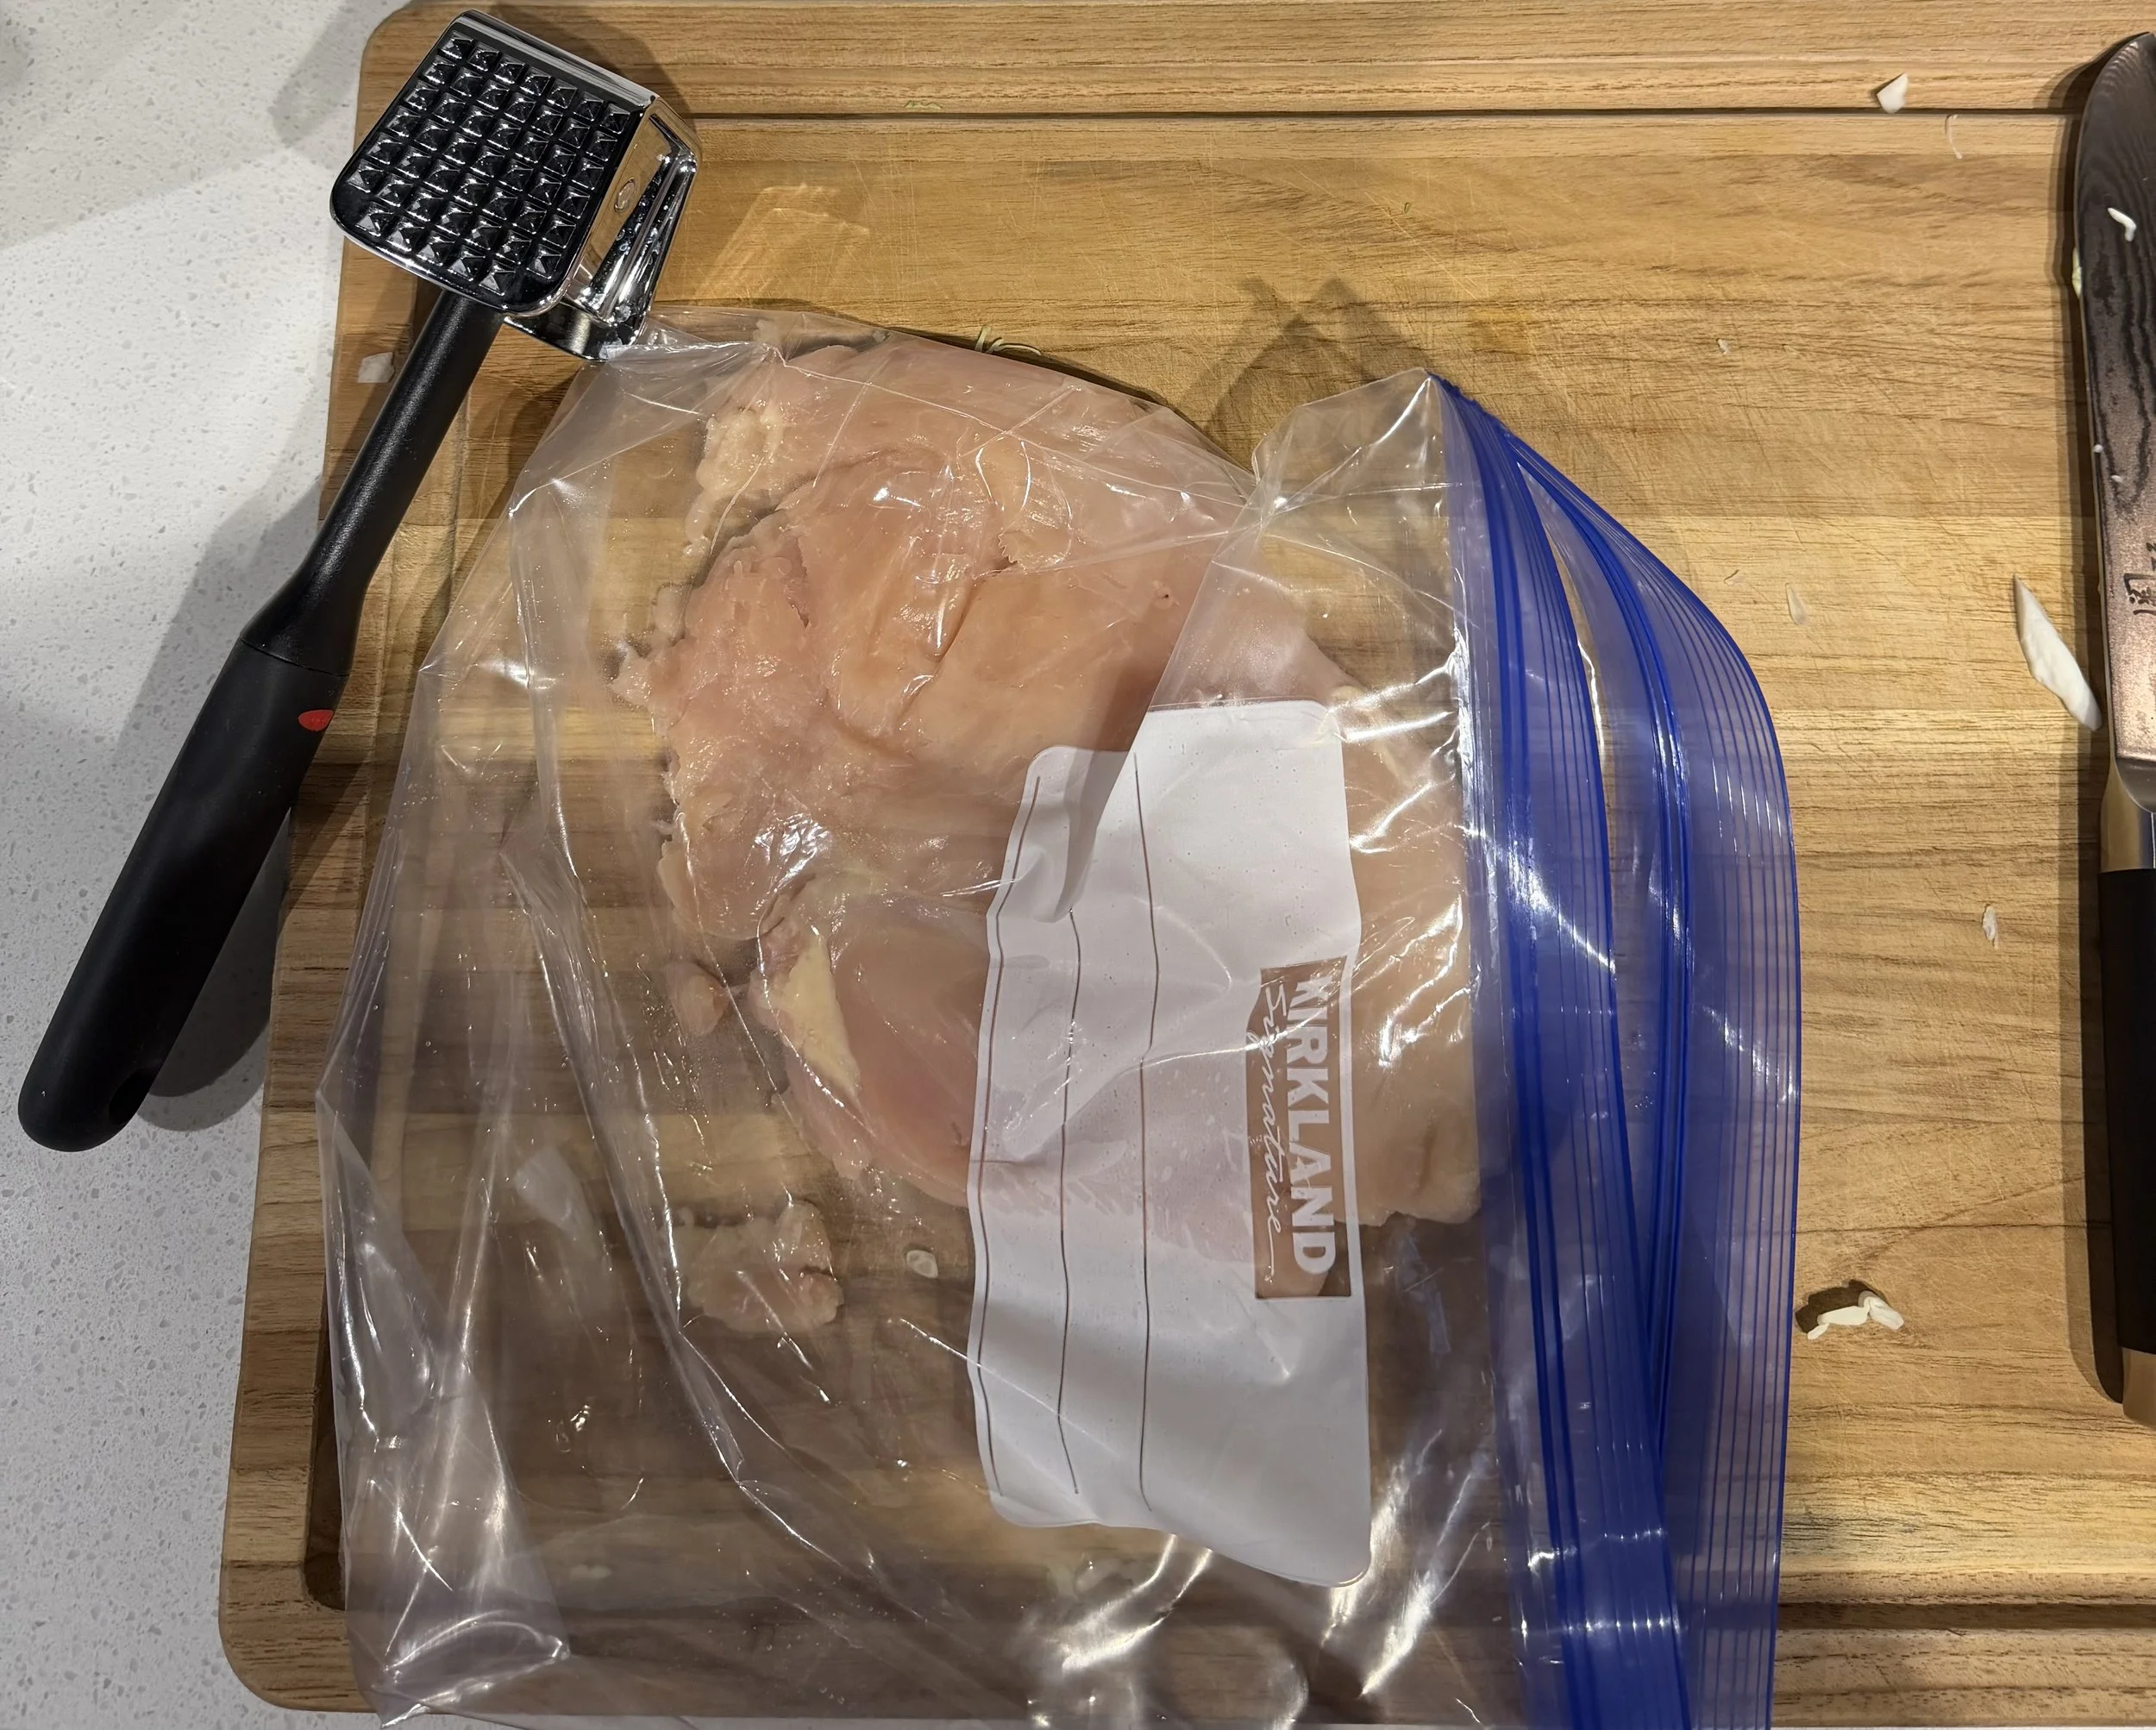
Pounding the meat;)
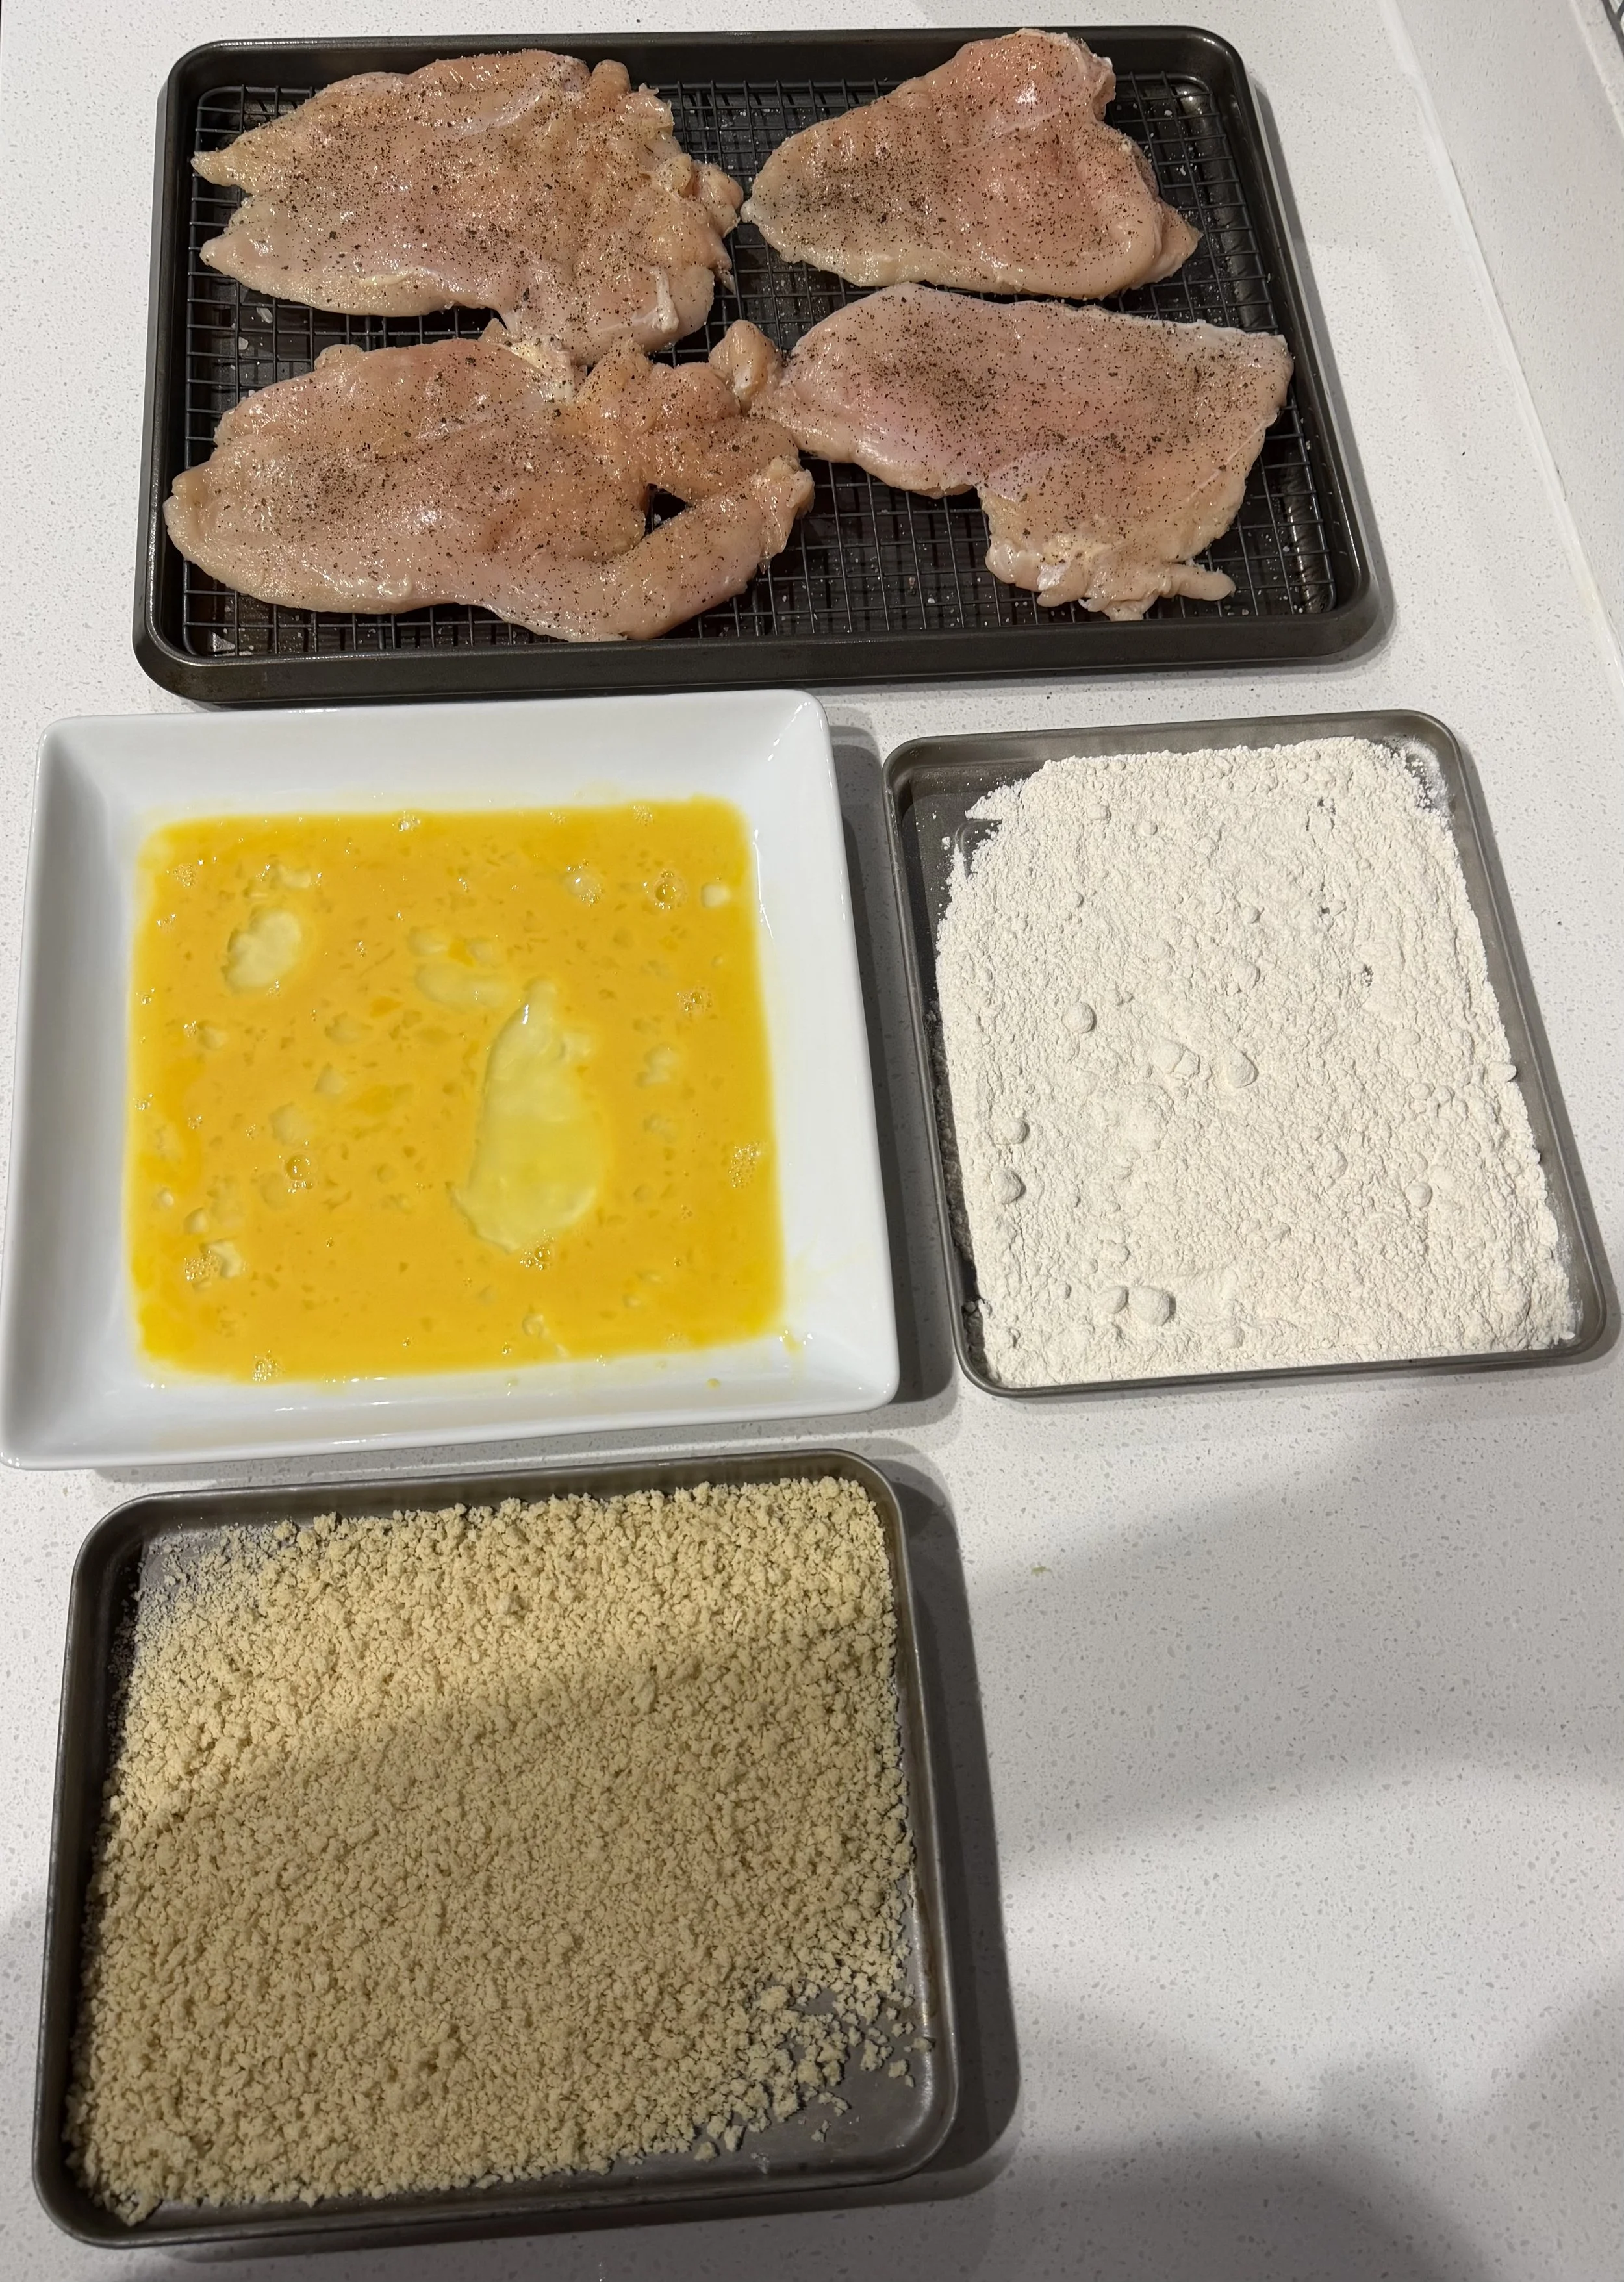
The calm before the storm (mess).
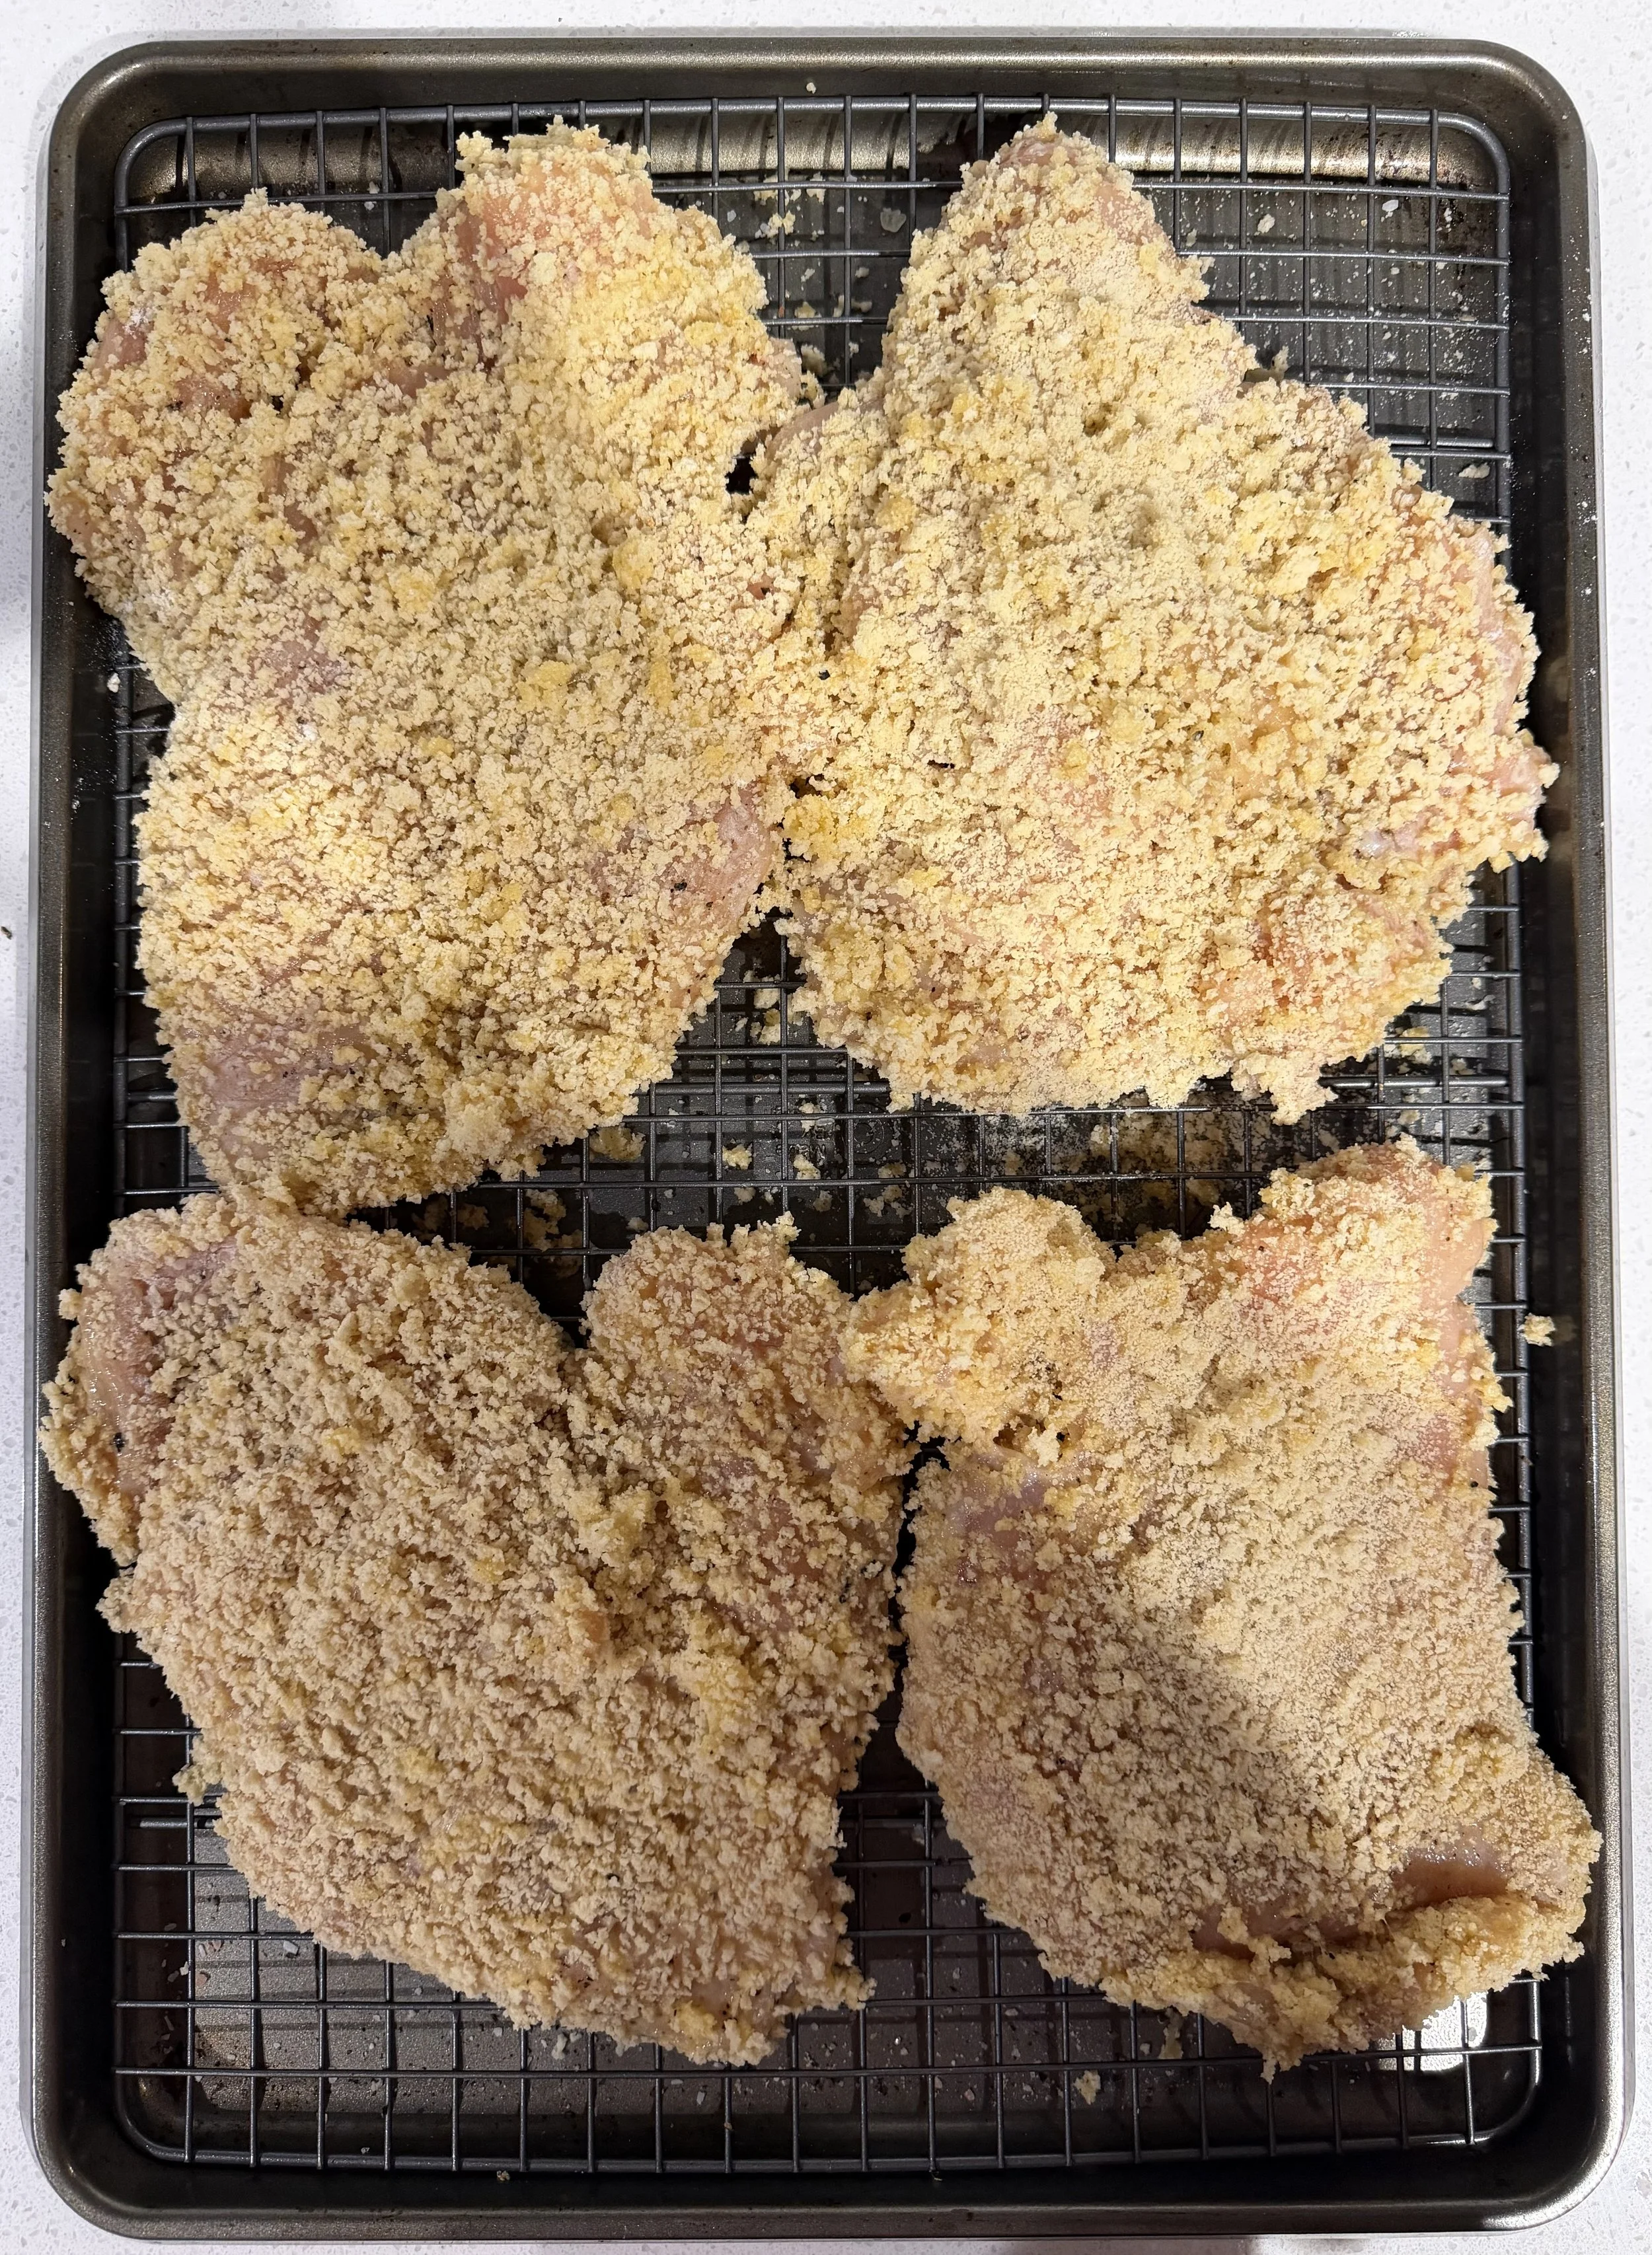
The cutlets ready to get fried (no THC involved).
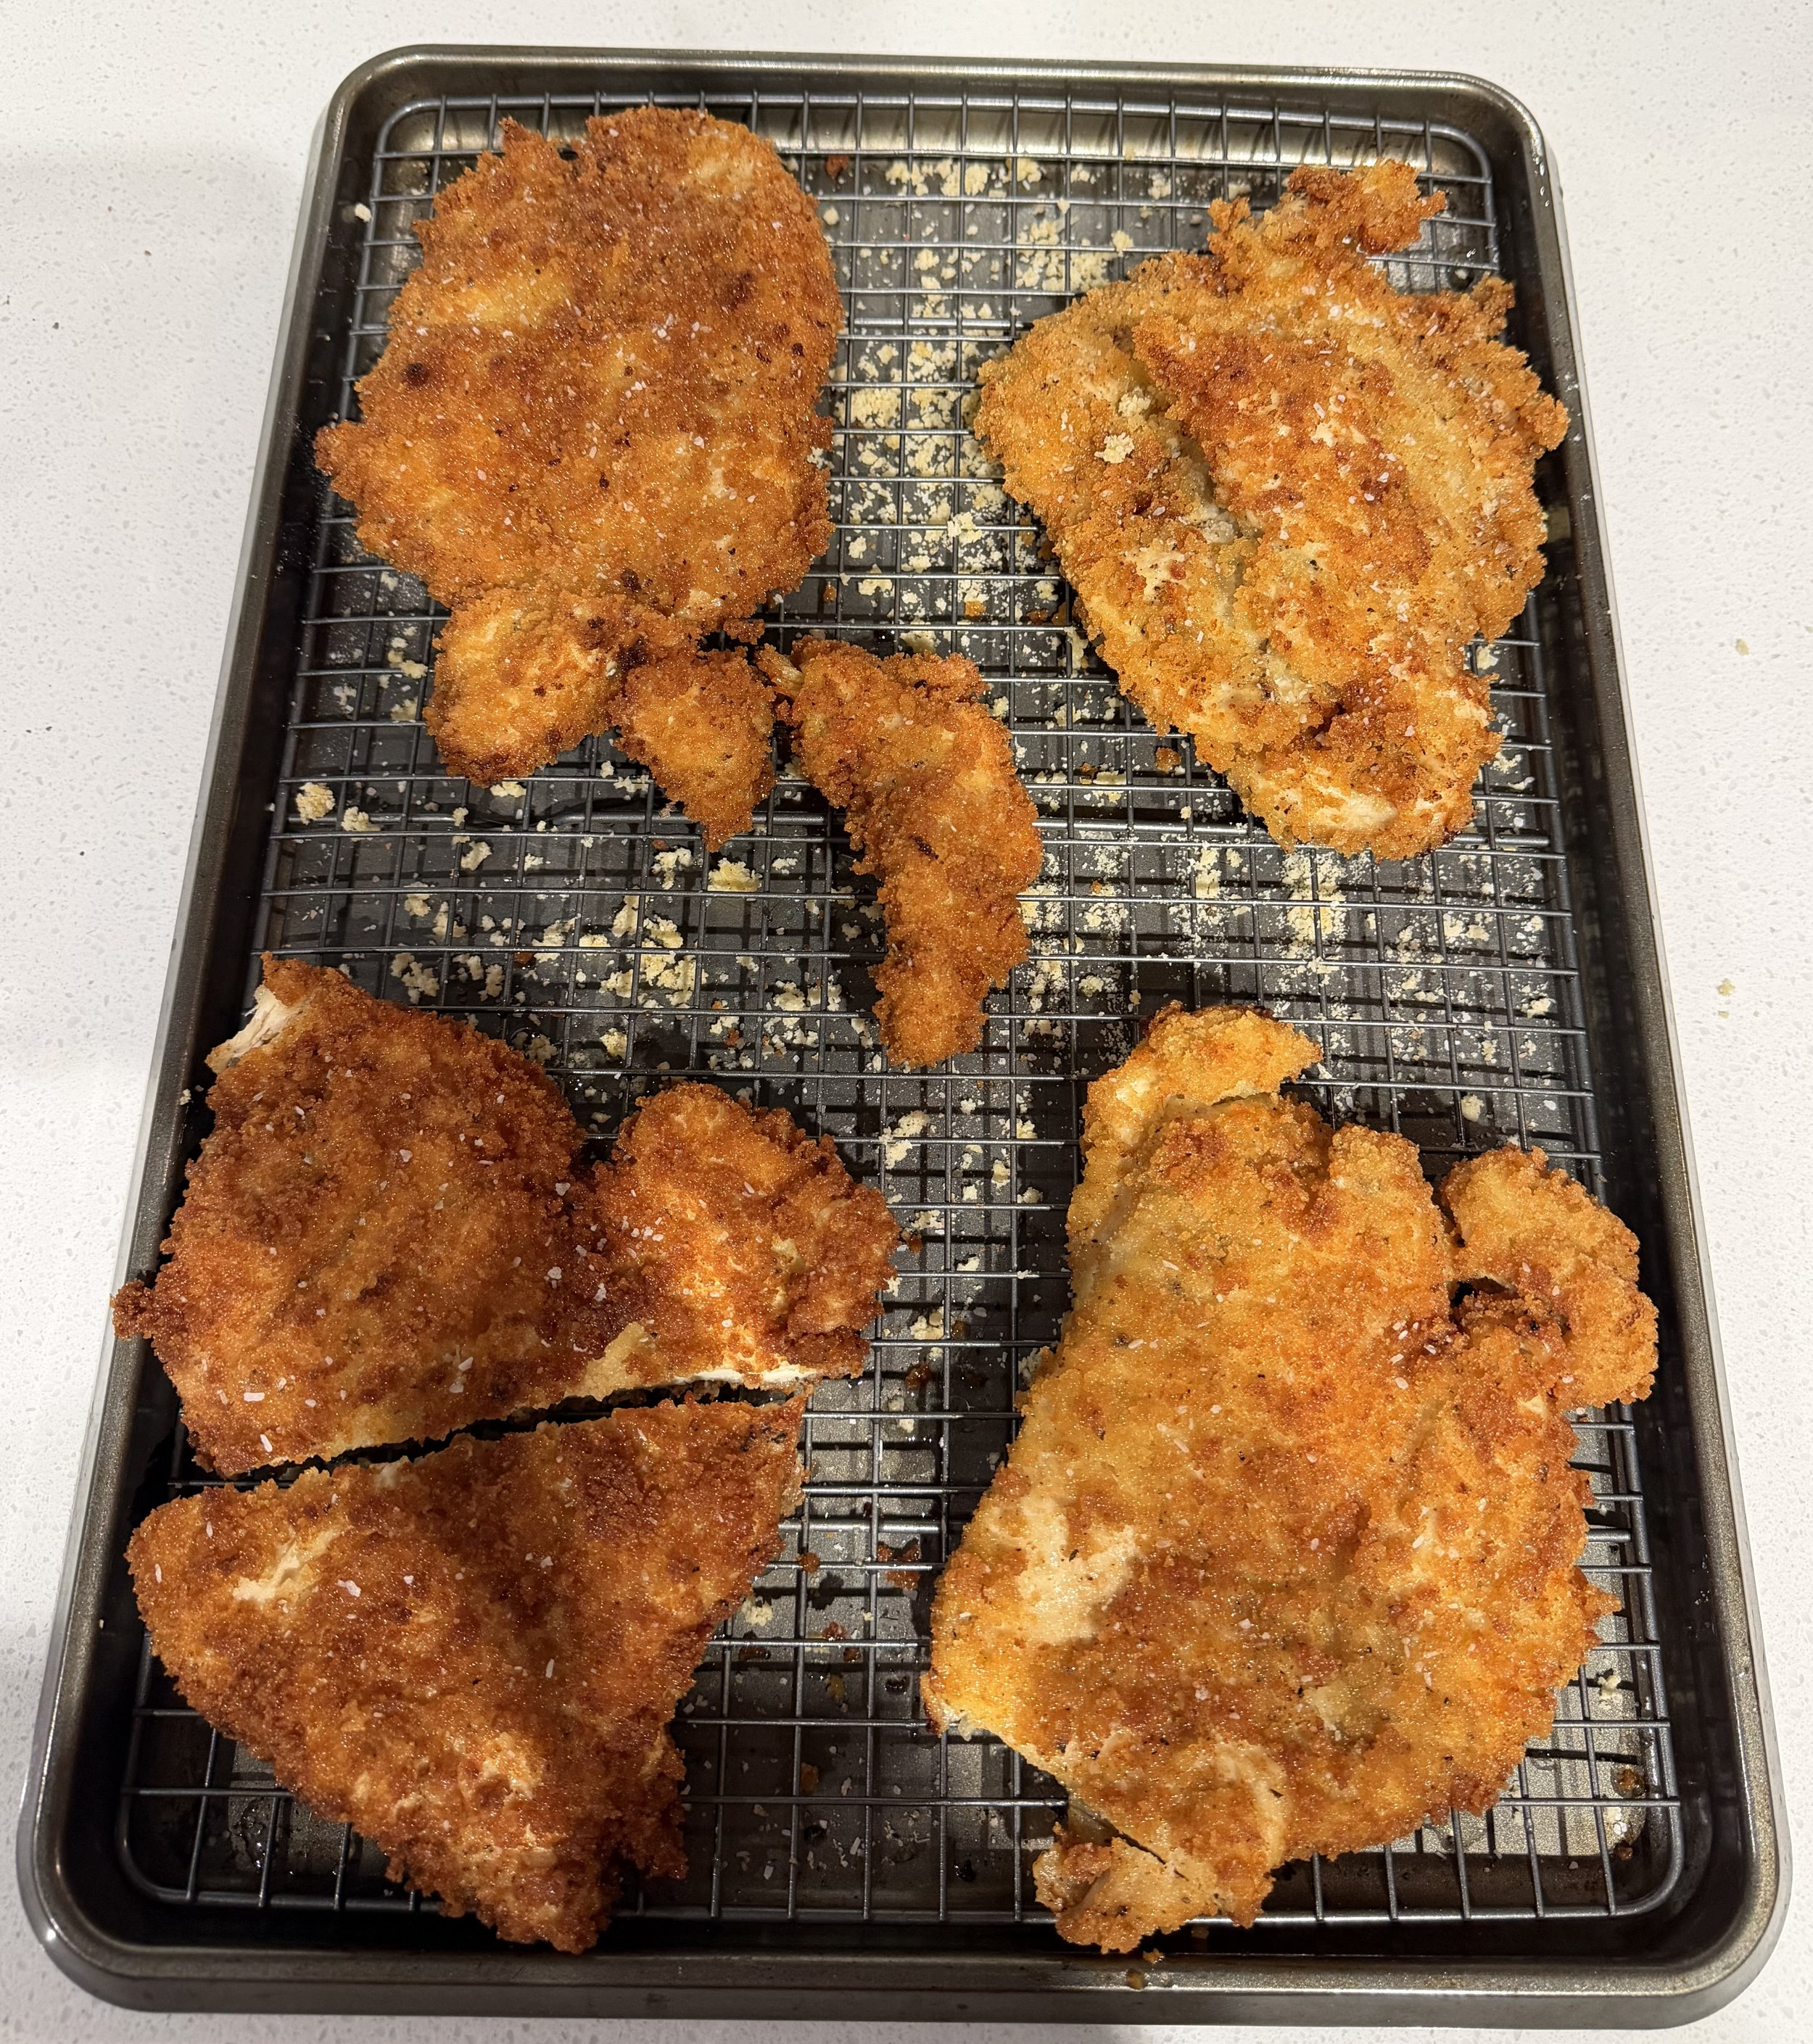
Look at them scrumptious cutlets. *Pay no mind to the few edges I cut off due to my ravenous hunger at 9:30 pm.
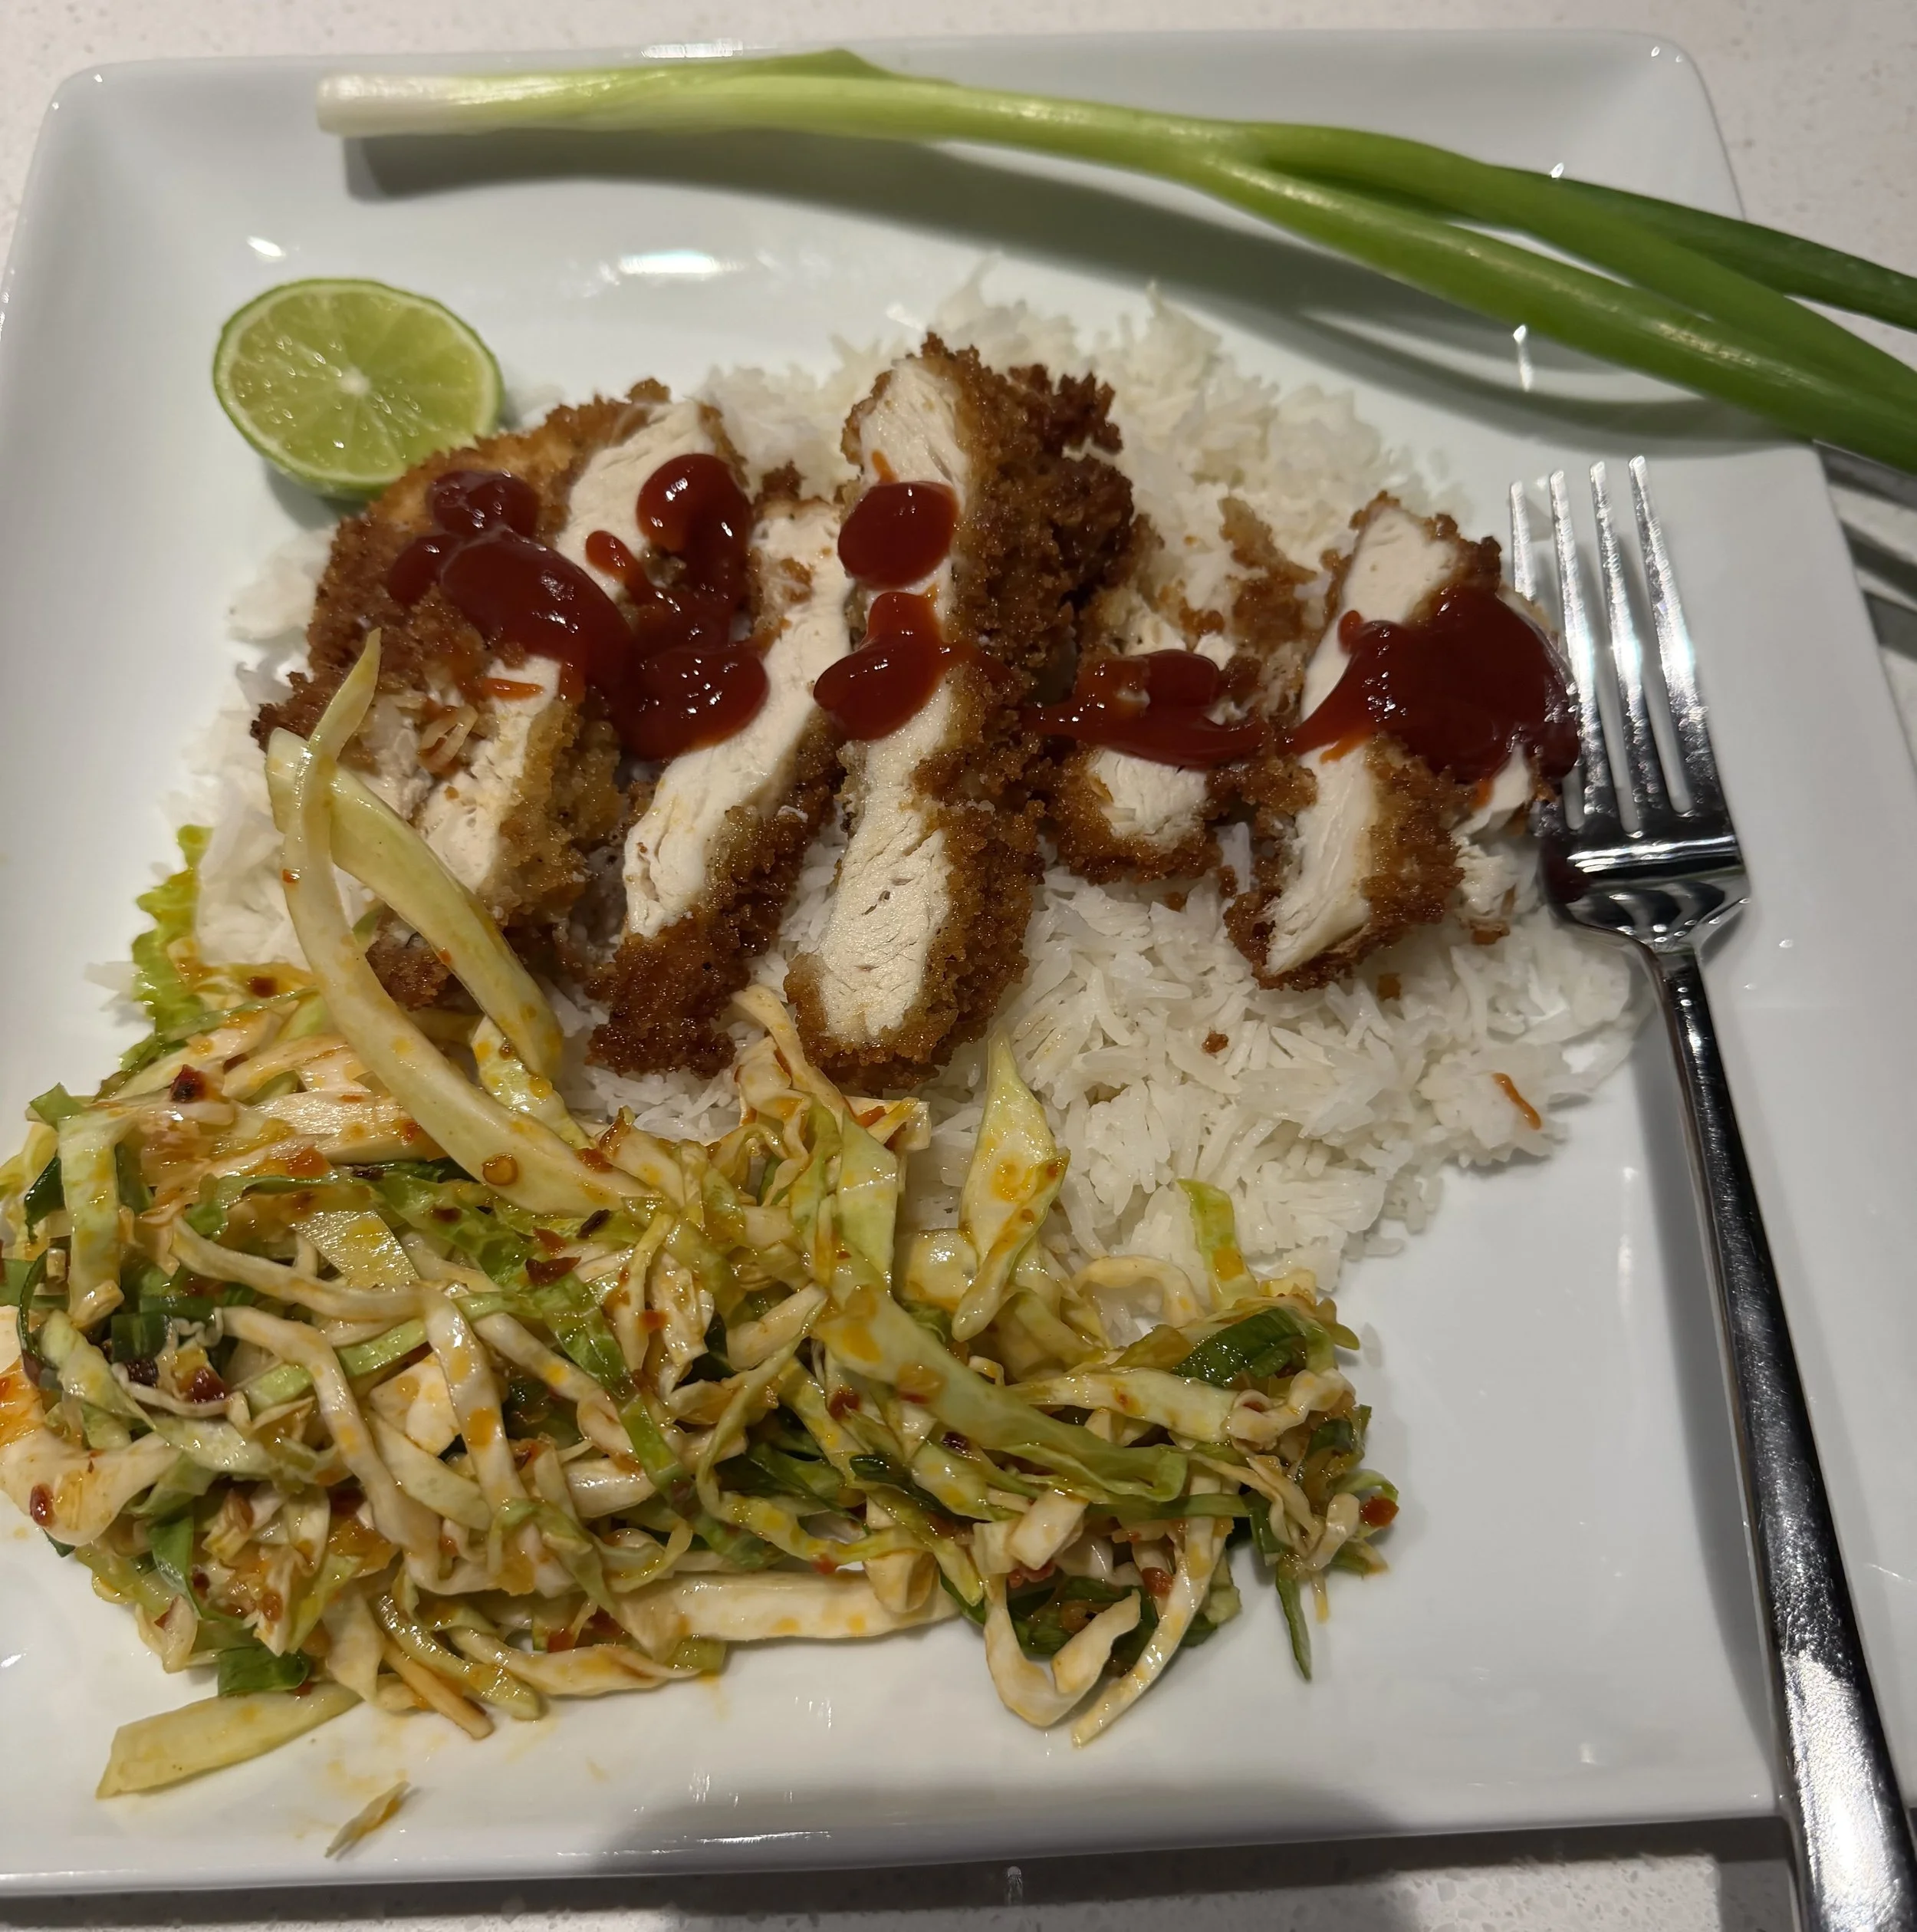
The final product!